Thursday, August 5, 2010

Head Start Program


The AmeriCorps team began this garden with the intent to donate some food, and to cook with some vegetables to educate the community about healthy eating. However, there were way too many vegetables for us to eat, and too few vegetables to donate in a manner that seemed fair. As we contemplated the fate of our vegetables, Donna- the woman who began the community garden program- approached us with a solution.

St. Matt's Head Start is a preschool in Ossining that has an amazing program. The young children had been visiting the garden and picking vegetables, in order to learn about healthful eating. Other gardeners had been contributing to this amazing program by giving permission for the children to pick from their plots. We were very excited to learn about this, and to let the kids pick from our bounty of tomatoes and cucumbers.

Donna told me about how excited the children are to be in the garden. She described how one child screamed in delight when he thought he saw an apple, even though it was really a green tomato!

As a child, you are concerned about the taste of food and the happy meals that come with it, you don't think about the nutrition. It is nice that the children at St. Matt's are viewing eating healthy vegetables as a fun activity, and hopefully this will be a notion they carry throughout their lives.

I am proud that we are helping to shape these young children's positive views of vegetables.

Tamisha (age 3) and Franklin (age 5) from
St. Matt's, posing with bok choy just picked
from the Ossining Community Garden.
Photo credit to Donna Sharrett.


Monday, July 26, 2010

From Ground To Plate: Homemade Cucumber & Onion Salad


There seems to always be cucumbers hanging from the vines, so I wanted to turn our large bounty of cucumbers into a delicious dish for the AmeriCorps team retreat. I found a recipe for a cucumber and onion salad and it seemed like the perfect snack to bring for a cook-out.

The required ingredients were:
2-3 large cucumbers
1 medium white onion
1/2 cup sugar
1 cup white vinegar
2 cups water
1 tablespoon pepper
salt
You will need a 2 quart jar with lid or other 2 quart container

I began by cutting off the ends of the cucumbers and peeling the cucumbers. I did not peel the skin off of the whole cucumber, instead I cut along the long edge in 4 strips. The cucmber looked like it was striped.


I then cut the cucumber into thin rounds.


Next, I had to peel and slice the onion into thin slices and separate. This was a doozy because the onion really stung my eyes!


Then, the recipe calls for you to place the cucumber and onions alternately in your jar/container. I tried to alternate as efficiently as possible, but I just tried to make sure that the ingredients were evenly spread out so that every cucumber was touching an onion for the full flavor.


Next, you had the rest of the ingredients. I recommend tasting a cucumber after you do this. I found the mixture to be a bit watered down so I added some extra vinegar and spices, but then it had a bit too much of a bite. I kept adding ingredients and water until I found the mixture to be right. You then cover the container tightly and gently turn the ingredients so that they are mixed together.

Refrigerate overnight and serve cold.


ENJOY!

From Ground To Plate: Homemade Coleslaw

To celebrate the end of our AmeriCorps term, the team went on a retreat to Baker Camp along Lake Sebago. Many of us visited the garden earlier in the week to harvest vegetables and make delectable dishes for us to devour on the retreat! The first dish I decided to make was coleslaw.

The ingredients for this dish were:
8 cups cabbage, finely chopped
1/4 cup carrot, shredded
1/3 cup sugar
1/2 teaspoon pepper
1/4 cup milk
1/2 cup mayonnaise
1/4 cup buttermilk
1 1/2 tablespoons white vinegar
2 1/2 tablespoons lemon juice

My work began by harvesting the cabbage and the carrots from the garden.


Next, I had to prepare these ingredients, which was a task greater than I had anticipated. The recipe requires that the cabbage need to be finely chopped to about the size of a grain of rice. Unfortunately, I do not own a food processor that can easily cut the cabbage. To accomplish this, I had to cut up the cabbage and then place small amounts in the blender to mince. This process took almost 2 hours, to make 8 cups of cabbage and this required most of the two heads of cabbage.


To chop the carrots, I peeled them and then placed the thin strips of carrot in the blender. I thought that I would have more than enough carrots, but instead there was just barely enough. While I thought the carrots were ready to be harvested, some of the carrots were soft to the touch and not firm enough to peel. I think that if they had been in the ground just a little bit longer they would have had time to grow stronger and firm up.


Once these ingredients were prepared, it was smooth sailing. In a salad bowl, combine the sugar, salt, pepper, milk, mayonnaise, buttermilk, vinegar, and lemon juice. Beat the mixture until smooth. Then add the cabbage and carrots, mix well, and then cover and refrigerate.

I also decided to add a twist to this recipe. I added a handful of raisins to the coleslaw to make it sweeter and balance out the bite of the sauce. I think it was a good touch.


Despite my lack of cooking skills, this came out really delicious and everyone liked it! I definitely want to use this recipe again, but before I tackle this again I will make sure to have a food processor handy!

Thursday, July 22, 2010

Ready To Harvest

Last week we had a work retreat, and we wanted to celebrate by making dishes with the vegetables we had worked so hard to grow. I went with JM to the garden and so many of the vegetables were ready to pick! We pulled up what we can & here is what we found!
TOMATOES


STRING BEANS

CABBAGE


CARROTS!

We picked more cucumbers on this day too. All of this could make one big, delicious salad. But, we have other plans for these vegetables. We'll show you how we took these vegetables from the ground to our plates in the next blog post!


Thursday, July 8, 2010

Battles in the Garden

On Tuesday I visited the garden after the long holiday weekend. Before I arrived, AC warned me that the cucumbers had become unruly and handed me some string. When I saw the growing cucumbers, I realized why she had handed me so much twine.

When we began this gardening venture, we made a tee-pee structure of four large stakes for the cucumber vines to climb, but now there seems to be six vines. Instead of growing up, they seem to be spurting new vines! And with these extra inhabitants, there is a battle over territory. RG and I added two new stakes, but some of the vines have to share. The cucumbers still seem to be growing in abundance, however I am concerned that because the vines are not growing upwards that this might limit our crop.

The other vegetables seem to be battling the heat in an honorable fashion. Some of the tomatoes have turned red, and the lettuce can be harvested again. The orange carrots are also starting to poke out of the ground. They remind me of the radishes; for weeks all we could see were leaves and then one day the vegetable popped out of the ground. This image also reminds me of a pimple. But, I think it is kind of amazing how nature works; like it is hiding the vegetable from us until it is ready to be picked.

Some of the vegetables do seem to be wilting in the dramatic heat. The Russian Red Kale seems to droop towards the ground, but the leaves are growing larger and is still a beautiful color that reminds me of the ocean- it is a misty shade of blue outlined by purple. The newer bush beans also seem to have it a wall in their growth due to the heat.

Hopefully, we will soon have a sudden rain shower that will nourish the garden, but not force us to stay in on a summer day.

Wednesday, July 7, 2010

The Pickling Follies


Last week I decided to pickle two of the large cucumbers, that I picked from the garden. I looked online for a recipe and thought that this would be an easy task!


Grocery Shopping: The recipe recommended making the pickle juice with a pre-packaged mix that contained all of the seasoning. Unfortunately, the A & P grocery store, does not carry this. In fact, when I asked a stock boy for directions to the pickle mix, he laughed and said he had never seen that before. So I had to make my own pickle juice from scratch with the ingredients I could find at the grocery store. As I picked up each ingredient and looked at the jars of pickles, I realized that it may be less costly and more time efficient to just buy the jar of kosher dill pickles. But, I was excited and determined to persevere through my experiment!
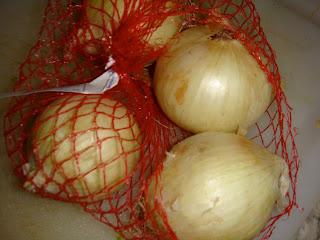
Ingredients for pickles!

Pickle Juice Recipe: Unfortunately, I had to modify the original recipe slightly, what I changed I have put in italics next to the original ingredient:
1/3 cup sugar or splenda
1/3 cup kosher salt
1/2 cup packed fresh dill
2 white onions peeled & chopped finely (I substituted 5 teaspoons of onion powder)
3 cloves garlic, peeled & thinly sliced or 3 level teaspoons prepared (minced) garlic (I used minced garlic)
1 tsp mustard or celery seed
To this mixture I added 2 cups of clear vinegar
I heated this mixture to a slight boil, while I cut the pickles into long spears.
The dry ingredients, sans vinegar
The cucumber spears
As I occasionally stirred the mixture, I was curious about how it was going to turn out. I decided to lean my head towards the mixture and get a slight whiff of it. Big mistake! I had boiling vinegar and garlic and onion waft up my nose, and it stung! So a word of caution to everyone who is as curious as me, do not smell the pickle juice!
boiling pickle juice

Where it all goes wrong: The recipe I had found called for you to pour the pickle juice into glass jars containing the pickle spears. This was supposed to fill up to within 1/4 inch of the top. Unfortunately, as soon as I poured this boiling water into the jar I heard a crack! My great-grandmothers mason jar had cracked along the bottom, and pickle juice was seeping out on top of the counter!
Cracked jar
I scrambled to save what juice I could. I put the cracked glass jar back into the pot so that all the juice could be collected, and I scrubbed the counter trying to get the biting small to not stick. Unfortunately, when I tried to pour the salvaged pickle juice into a new glass jar, it only filled half of the cucumbers. I tried to imagine what a half-pickled cucumber spear would look like, and hated the thought.


Instead, I took out the cucumber spears, chopped them in half and put them back in the jar. Though the pickle juice didn't fill the container fully, at least it covered the cucumbers. I then screwed on the lid placed it in the fridge, and hoped for the experiment was a success.


Then I waited: For one full week I waited to taste my first pickle.

Moment of Truth: Last night I was finally able to taste my pickles and . . . they didn't taste bad! In fact, they tasted pretty good! The pickles taste like dill pickles, but they also have a slightly tangy sweet taste. I can't quite place it, but I am sure that to get a genuine dill pickle taste I would just have to make sure I used real white onions next time.

So this experiment was happily a success. And I look forward to trying it again!


Thursday, July 1, 2010

Goodbye Estelle, Hello Salad!

Estelle has been our gardening expert extraordinaire! She has been the one guiding us through the gardening process. Our first day in the garden she made us all spread out and act like a compass, so we could figure out which spots would get the most light. According to our makeshift compass and her knowledge of each vegetables needs, we were able to plant our vegetables based on which needed the most sunlight. Thanks to her, our garden has flourished and we were able to harvest a small salad to eat in honor of her last day with AmeriCorps. We will definitely miss her but wish her luck in her future endeavors!

Of course, every day in a garden is a learning experience. Though our salad was tasty, because we waited so long to harvest the arugula, spinach, lettuce and radishes, they were bitter. The radishes in particular, had a strong kick to them. I never knew a salad could be so flavorful without salad dressing! It was interesting to be able to taste the difference between organically grown vegetables and the vegetables you purchase in the grocery store.

To watch us harvest the vegetables, watch this video!

Monday, June 28, 2010

Nourishment

I had an interesting thought today when thinking about the vegetables we have begun to harvest. For the past couple of months we have worked hard to nourish our garden: we figured out what spaces in the plot would give the most sunlight to the vegetables that required it, we watered our garden every day, we took out the dried leaves that hadn't decomposed because it would take away from the nourishment of our plants, and we have weeded the pesky weeds that compete in the soil with our vegetables. We have done this to keep our vegetables healthy, and so that they can grow.

Now that we have begun to harvest our vegetables, the roles have changed. These plants will nourish us and provide us with the nutrients we need to grow big and strong.

To me, this partnership is a pleasant example of how you will get back what you put in.


Some new vegetables have begun to grow in the garden! Here are some new faces that we have not seen before:
Onions

Sweet Basil
Green bell peppers


And some of the older bush beans have grown taller and begun to form beans!

I can't wait to harvest these vegetables and taste what we have worked hard to grow.

Thursday, June 24, 2010

How quickly things change


On tuesday I visited the garden with my friend, to show off the AmerCorps' hard work. It was my day to water the garden, but the sky was gray and the air was thick with humidity, it seemed like a storm was coming any second. However, the sky had been this color all day, and a drop of rain had not fallen yet. I turned to Donna and asked her if I should water the garden, or if it would drown if I water the vegetables and then it rained. She looked at our plot and noted that the ground was still moist from the day before, but took note of the seedlings we had planted the week before. These tiny sprouts were still buried under the ground, and a few were beginning to poke up from the dirt, but they were not big like the other vegetables in the plot. She suggested I water only those seedlings, so that if the sky did not release the rain the seedlings would still be watered. When I left the garden the weather seemed to improve, until it became evening and there was a tremendous thunderstorm.

When I returned to the garden I did not know what to expect. Would the vegetables be destroyed? Did our seedlings drown? When I inspected the garden I could not believe what I saw- the seedlings had flourished! The seedlings had become new bush beans! What had been nearly buried, was now a couple inches high, and had thick stems and leaves. And all of the other plants were still safe and sound.

It is awesome to see nature in action. Even though extreme weather can harm plants, I suppose they can adapt to some fluctuations in weather. I also can't believe how fast things can change in a tiny garden. It is incredible to know that one day I watered these seedlings and the next they became plants, i feel like my small bit of work helped the garden grow.

Here are photos of the bush beans that sprouted overnight, and of JM watering the new plants and seedlings.

Tuesday, June 22, 2010

My how your garden grows!

It is incredible to look at the garden and see the edible vegetables we have grown! Watch the virtual tour and take a peek for yourself!

Monday, June 21, 2010

Prevent Tomato Blight!

Everything is doing merrily in the garden, though it is getting hot, hot, hot for a gnome! If you don't see me when you come visit, I've burrowed deep into the soil to keep cool.

Last year, excessive rainfall caused many tomato plants in the Northeast to catch late blight- hopefully that won't be a problem this year for our cherry tomatoes. However, just in case- here are some tips to gardeners everywhere on avoiding late blight- from my gnome friends at Cornell:

10 tips to prevent late blight in home gardens

* Kill volunteer potatoes. Dig up, bag and trash any volunteer potato plants that pop up in gardens or compost piles. It may take repeated efforts to get them all.
* Use only certified seed potatoes. Don't use leftovers from last year or table stock from the grocery store.
* Buy healthy tomato plants. Learn what late blight looks like. Report any infected plants while shopping or grow your own plants. (Late blight isn't spread on tomato seeds.)
* Keep plants dry. If plants need watering, water the soil -- not the foliage.
* Inspect plants at least once a week, more often if weather is cool and wet. Immediately remove and bag any foliage you suspect might be infected.
* If symptoms continue despite removing infected foliage, consider removing plants entirely -- sooner rather than later. The longer you wait to remove plants, the more spores will be blown to other gardens and farms.
* Warn neighbors and local Cooperative Extension if you find late blight in your garden.
* Remove infected plants during the middle of a sunny day after leaves have dried. But don't wait for these conditions. Seal plants in garbage bags and leave them in the sun for a few days to kill plants and the pathogen before placing in the trash or burying underground or deep in a compost pile.
* Keep an eye on other tomato-family plants. Some strains of late blight can infect other tomato-family plants, including weeds such as hairy nightshade and bittersweet nightshade. Control them early so that late blight on these plants doesn't go unnoticed. Petunias and tomatillos are also vulnerable to attack.


Craig Cramer is communications specialist in the Department of Horticulture at Cornell.

Summer Solstice!

Happy Summer Solstice!

The other garden gnomes and I celebrated the beginning of summer with some dances that will hopefully make our crops grow big and strong! Everyone should take some time during this beautiful summer day to appreciate the sunshine, whether it is by working in a garden or laying down in your backyard.

How to Train Your WIld Cucumbers

Here is another instructional video taught by our gardening expert Estelle! She is showing us how to train the cucumbers so they will climb up the large teepee structure in our garden. We want them to wind their way up this structure so that they stand tall, and this will bear more fruit.

Thursday, June 17, 2010

So Much Green!mp


Our little plot, which was barren and brown a few weeks ago, had turned into a small green forest. Though it may look like there are some empty rows in this plot, looks can be deceiving. We have recently plotted some seeds in these rows; we have now added more bush beans, lettuce, and swiss chard to our plot. We were all intrigued by the small seeds of the swiss chard; they were small, a nude color, and had many sharp points like a 3-dimensional octagon. Thank you Donna for donating these vegetables to our garden, we definitely appreciate it!

Wednesday, June 16, 2010

Garden Song Lyrics

Here is part of a song I love to sing to the garden when no one is listening. It is from, "Garden Song" written by David Mallet, and many of you may have heard it sung by John Denver or Arlo Guthrie.

"Pulling weeds and picking stones
Man is made of dreams and bones
Feel the need to grow my own
Cause the time is close at hand

Grain for grain, sun and rain
Find my way in natures chain
Tune my body and my brain
To the music from the land"

How To Train Your Wild Tomatoes

Here is an instructional video taught by our very own garden expert, Estelle. Watch to learn how to train your tomatoes that are growing out of control!

Tuesday, June 15, 2010

We have some plants growing!

Last week some vegetables began to poke out from the ground and behind leaves. Take this virtual tour and see our cucumbers, tomatoes, and radishes grow!

Monday, June 14, 2010

I'm the Gardening Man

Duende Deunde, I'm the Man. If I can't garden no one can!

Marigolds

We have planted a border of marigolds around our garden. These marigolds are not just pretty, but they also serve an important purpose. They act as natural pest repellants once they flower. This will help our vegetables grow safely.

We were able to do this with the help of our garden-expert and pest control extraordinaire EM! and Thanks to help help of JM, who once again nurtured the marigold seedlings to be planted.

Baby Tomatoes!


We have some baby tomatoes beginning to peek out from underneath their leaves. I didn't realize that tomatoes could be tasty and pretty, but the yellow flowers that are also blossoming from the plants add some much needed color to our garden. I hope more plants grow soon!

Friday, June 11, 2010

Tuesday, June 8, 2010


Here is a semi-instructional video following us,
as we plant our garden during AmeriCorps week :)


Monday, June 7, 2010

What we are planting

Thanks to the mothering skills of JM and the transplanting skills of EM, we have been able to plant a variety of vegetables. These plants we either grown from seeds, or tansplanted from donations as seedlings. One of the benefits of working in a community garden has been that many of our fellow gardeners have been willing to lend us a helping hand! We are growing:
cucumbers beets basil
radishes spinach tomatoes
bush beans arugula lettuce
carrots peppers

Planting the Garden


Our seedlings were nurtured by JM, but on May 14th it was time for the plants to leave their egg cartons and flourish on their own. For weeks JM was the seedlings mother, she grew the seeds in biodegradable egg cartons and nurtured them until they grew some roots. With the help of some visitors we planted the delicate seedlings into the ground and hope that they will take root in the soil and grow into healthy vegetables.